Anyone, anywhere on this green Earth can grow and maintain a sourdough starter. It’s not difficult. Just mix and ferment flour and water and give it some time. It is that simple. You can grow a healthy long-lasting starter in just a week.
Add filtered water and flour to a jar every day stir, and wait for nature’s magic and guess what it happens every time. Whole grain flour, the air and our environment, and even our hands all contribute wild yeast and lactobacilli (LAB) into the mix, that works together to create a natural product that will make bread rise.
But to help your daily expectation, this post describes the 7 day journey. Describing what you should expect to see in your new starter every day along the way, until you have an active, ready to use starter to make your own sourdough baked goods.
"Anyone can create and maintain a sourdough starter. It’s not difficult. A healthy long-lasting starter is maintained by a regular feeding schedule of flour and water. The feedings may occur from a couple times a day to once a week."—Carroll, Pellegrinelli, Carroll in Starter Sourdough
____________________________
While staying at home to #StopTheSpread here at Riverside Lodge, my wife and I have been enjoying walks on the Provo River path. But we still have to work at finding good things to do when we are home and that is 23½ hours of every day.
So I thought, “Why not grow my own start?” I have two legacy starts, one in the fridge from San Francisco and one in stasis in the freezer from Alaska. The frozen one is an all rye start. I use the other one two or three times a week. It’s usually a counter start, but once in a while, it gets to rest in the fridge for a week when I have baked too much bread.
I love them both, but with all this extra time on my hands, I want to see what a homegrown Utah start will be like. It usually takes up to a week, so let’s start something new together, right now.
Seven Day Starter Countdown
Day 1

To begin I sterilized a large canning jar, ground some wheat and rye berries, and put ⅓ cup (32 g) into the jar. Then I added ¼ cup (32 g) of filtered room temperature water (the chlorine in tap water can inhibit wild yeast and LAB from growing well). I mixed it all together and set it on the counter with a loosely fitting cover.
"When establishing the starter, weigh the flour and water in ounces to get a more accurate measurement than in cups (volume)"—Carroll, Pellegrinelli, Carroll in Starter Sourdough
Day 2
There wasn’t much going on yet. In fact, the flour and water had separated, but I fed it again. This time with ⅓ cup (32 g) of unbleached bread flour and another ¼ cup (32 g) filtered water. I mixed it all together and set it on the counter with a loosely fitting cover again.
Day 3

There seems to be some activity already as there were a few bubbles showing. I fed it again with ⅓ cup (32 g) of unbleached bread flour and another ¼ cup (32 g) filtered water. I mixed it all together and set it on the counter with a loosely fitting cover once again.
Day 4
On day four I could say “It’s alive!”
The starter looked nearly ready with more than a few bubbles showing, it had nearly doubled in volume, and it smelled like my other counter starter. I removed half the contents and used it in some English muffins I am making, which rose just fine. Then I mixed ⅓ cup of unbleached bread flour and ¼ cup filtered water back into the start, covered it loosely with the lid, and placed it on the kitchen counter again.
Day 5
Today the starter looked frothy, which means it had consumed most of its food, risen, and fallen back on itself. I fed it right away again, but with one cup (125 g) of bread flour and ¾ cup of filtered water to build my volume.
It looks like this new “pet” is alive, but it still is a baby and may need feeding a small amount of water and flour every 4–6 hours. However, I know it’s not ready to go in the fridge. Yet, the float test showed that this is nearly viable.
“For the float test, drop a small amount of starter into a glass of room-temperature water. If it floats, the starter passed the test! If it sinks, you either need to let the starter sit longer to develop more bubbles, or feed it again and let it sit until it passes the float test (usually 6–12 hours).”—Erica at Pioneer Woman
Day 6
Today I repeated the smaller, regular feeding (⅓ cup [32 g] flour and ¼ cup [32 g] water) but this little “baby” is really growing well now and is ready to use as a counter start.
Day 7
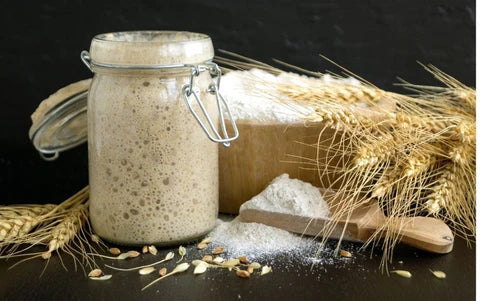
 Glass canning jars are good for growing a starter but stay away from metal lids.
Today I am pouring off all but one cup of starter to use in a recipe later which means for the first time, my bread is really all mine, from start(er) to finish. But the starter is not really fully mature yet, even though I am getting bread and other sourdough baked goods from it.
“After 2 weeks total, I fed the starter one last time and put it in the fridge for long-term storage. You want to wait to store a starter in the fridge until it’s well established.”—Erica at Pioneer Woman
Sadly I read this after I put mine in the fridge, but I have saved some “old dough” from the loaf I just made. I added some water to hydrate it 100% (50/50 four and water). I will keep this on the counter for another seven days using it as a counter start for bread and such. After that, I will let it rest in the fridge.
And for those of you who are the occasional baker, you can feed your starter, then keep it in the fridge for two months before feeding it again. However a long, cold storage like this require several (every 4 hours) room temperature feedings before it will be robust and active again.
Tell us how yours is doing in the comment section below, and now I have got to go and work on those English muffins for Sourdough Saturday.

Author: Darryl Alder lives with his wife in Riverside Lodge, which is their home, along the Provo River in Utah. He is a retired career Pro Scouter and outdoorsman who spent many hours over a campfire using a Dutch oven and loves sharing recipes for the kitchen and the campfire alike. You can see some of his outdoor recipes here and on this site by searching for Sourdough Saturday or Recipes in this blog.
2 comments
You asked:
So does the ratio of fresh flour + water to remaining starter (after the discard is removed) not matter?
It does, I prefer to use this ratio after discard 1:2:2
You asked:
I thought if we need 1:1:1 ratios we’d need to add quantities of flour and water equal to that of the starter – but then of course the total volume would just keep growing, given that we’d be multiplying the starter weight by 3 and then later dividing by 2 when we remove more discard at the next feeding. When does this 1:1:1 ratio come into play?
I need to correct that to read: “60g starter (after discard) to 120 g water and 120 g flour, for each feeding”
So does the ratio of fresh flour + water to remaining starter (after the discard is removed) not matter? I thought if we need 1:1:1 ratios we’d need to add quantities of flout and water equal to that of the starter – but then of course the total volume would just keep growing, given that we’d be multiplying the starter weight by 3 and then later dividing by 2 when we remove more discard at the next feeding. When does this 1:1:1 ratio come into play?