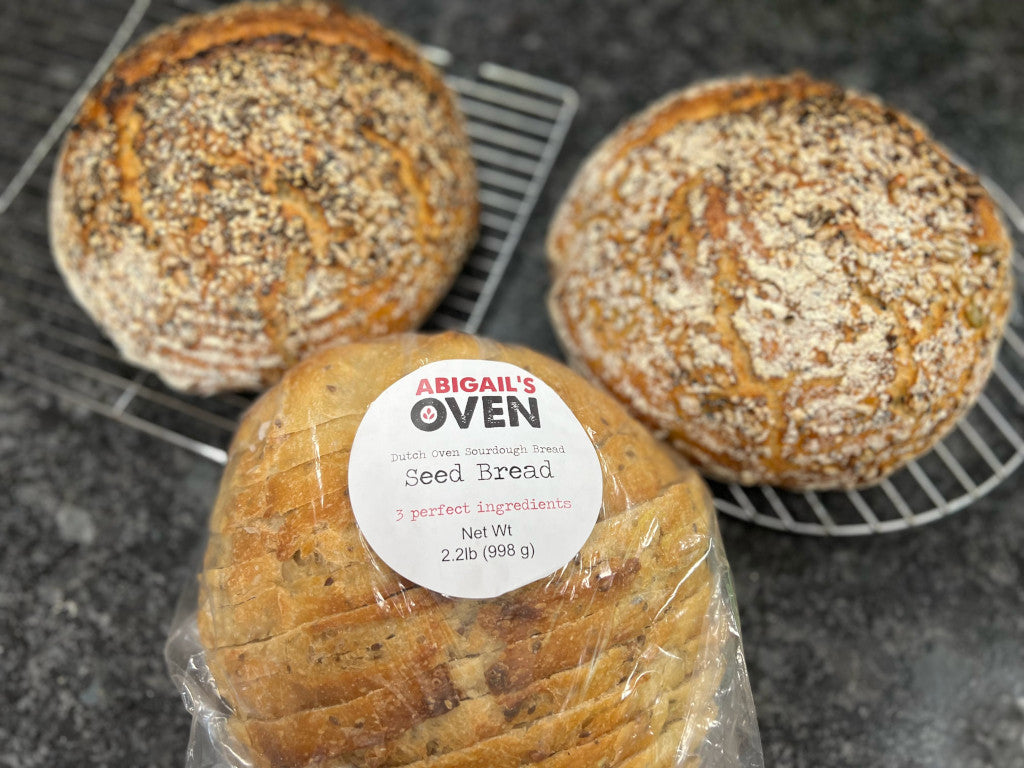
Many mornings I find myself craving a slice of Abigail's Oven Country Seed Bread or Rustic Wheat Seed Bread toasted and smeared with smashed avocado. A slice of either bread makes for excellent avocado toast, with just a sprinkle of Tajin, which offers just a bit of chili pepper, lime, and sea, salt that combined makes the avocado's flavor pop in your mouth.
Or if you want to double the crunch, you could mix up a batch of "Everything Bagel Seasoning" and sprinkle that over the top. Either way, you have breakfast in just a few quick minutes. And both ways are oh, so good!
While most of you will prefer the easiness of purchasing our seed bread at our Store at the Bakery or from a local grocer, some you may want to take on the challenge of making your own. So we are going to share our recipe here, but with a toasted seed twist based on Brian Lagerstrom's "How to Make SOURDOUGH BREAD WITH SEEDS (My New Favorite Loaf)," which you can view on his YouTube Channel
While Brian uses a series of very conventional steps including the use of a leaven in making sourdough that you can learn about on his YouTube Channel, Martha Levie, Chief Baker at Abigail's Oven, suggests just 7 Steps to Great Sourdough Bread Overnight. Hers is the easier of the two, but this recipe blends both of these baker's ideas to give you this:
Toasted Seed Sourdough Bread Recipe
SERVING: 2 1-lb. Loaves (about 36 slices)
(For single loaf just cut all ingredients listed below in half)
TIME: Mixing, Fermenting, and Shaping: 15–25 minutes, spread over 24 hours
Bread Baking: 40–50 minutes
Seed Roasting: 25 minutes Baking
DIFFICULTY: Moderately Difficult
INGREDIENTS:
- ¾ cup | 170g Active Sourdough Starter ( if making the leaven see step 1 below for additional flour and water)
- 3¼ cups | 760g Filtered, spring water (if your seeds are toasted, add ¼ cup | 60g additional water)
- 5 cups | 635g High Protein (13.5%) Bread Flour
- 3 cups | 360g High Protein (13.5%) Whole Wheat Flour
- 1 heaping Tbs | 20g Real Salt
- Seed mix (¾ cup/100g raw pumpkin seeds, ¾ cup/100g raw sunflower seed, ¼ cup/50g sesame seed, 3 Tbsp/25g hemp seed, and 3 Tbsp/25g flax seed).
INSTRUCTIONS
- FEED YOUR STARTER:
If you intend to use active starter from your mother culture, feed it four hours before you plan to mix the dough with ½ cup (120g) filtered water with ¾ cup (120g) of bread flour to insure it is active. This by the way, is the easier of the two ways to make your loaf rise, but if you want a "sweeter" more mild start that will not compete with the flavor of toasted seeds, you could try building a leaven with Lagerstrom's refreshment feeding steps:
"BUILDING LEAVEN/REFRESHMENT FEEDING:" he writes, "12 hours after feeding your starter, measure 50g (3 Tbsp+1 tsp) of 86°F/30°C water, 100g (7 Tbsp) of your ripe starter, and 50g (⅓ heaping cup) of flour and stir to combine. Cover and let sit at room temperature for 2-3 hours."
Both ways work fine, but the leaven method, is commonly done in artisan bakeries, and offers a more lively starter, with a milder flavor for your dough
- MIX, AUTOLYSE, and STRENGTHEN the dough:
While your starter (or leaven) is ripening, measure 3¼ cups/760g of 86°F/30°c water, 5 cups/635g bread flour, and 3 cups/360g whole wheat flour.
Using a large spoon or dough whisk mix this together for about a minute, then switch to mixing with wet hands until the dough is coming together.
Once this is mixed and there are no clumps of flour in the dough, let sit this mix sit covered at room temperature for 2 hours.
After that 2 hour wait, and when your starter is bubbly, active, and has passed the float test, add one cup/240g of it to your autolysed mix. Then using wet hands, pinch and poke this into the autolysed dough.
Once mixed, sprinkle 1 heaping tablespoon /20g of salt across the top of dough with 3–4 Tbs/50g additional water room temperature water and pinch and poke the salt into your dough
Allow this to ferment in a warm place, covered, for about 30 minutes, but while you're waiting:
TOAST THE SEEDS in a preheated oven to 325°F/162°C.
Pour ¾ cup/100g raw pumpkin seeds on a baking sheet, add ¾ cup/100g raw sunflower seed, ¼ cup/50g sesame seed, 3 Tbsp/25g hemp seed, and 3 Tbsp/25g flax seed. Stir and the roast seeds for about 25 minutes they are toasted a golden brown on the edges
FIRST STRENGTH BUILDING FOLD
After the 30 minute rest for the dough, with wet hands, take the dough from one side and stretch it up until you feel tension, then fold it over itself toward the other side of the dough.
Rotate the bowl and repeat this three more times.
Then cover it again and allow it to rest for another 30 mins.
SECOND STRETCH and FOLD 2 / INCORPORATING SEEDS
After the last 30 minute rest (or 60 minutes into the total fermentation time), add in a hand full of seeds, pinching and poking them into dough, then then stretch and fold once. Sprinkel another handful of seeds on top of the dough, pinching, poking, stretching, and folding the dough until seeds are just incorporated.
Cover dough and allow it to ferment for another 30 min and perform the final set of stretch and folds (we now have 90 minutes of total fermentation), and the dough should have strong gluten bonds and come together easily in a ball.
- BULK RISE/LONG FERMENTATION
There are several ways to foster the long fermentation time that is needed to make this bread. The easiest is to leave the dough in the mixing container covered for another 8–10 hours and then shape the dough.
But Lagerstrom suggests that when the dough has, "risen by about 30-40% [that you] flip dough onto lightly floured work surface and divide into two 1200g pieces (approx). Preshape as shown in video at 6:25. Cover pre-shaped pieces and let rest at room temperature for at least 15 minutes," and then move right to final shaping.
"Flour dough & work surface and transfer the dough to the work surface. See video at 7:32 for shaping technique and final 'seedin.' Put shaped loaves seam side up in floured proofing baskets, cover with towel, and proof at room temp 60 min-2 hrs. When well proofed, put in fridge overnight for 8-12 hours."
However, if you are using our easier, long ferment explained above, shaping can wait until just before baking.
- SHAPING DOUGH
After the dough is fully fermented (8–10+ hours) it is ready to pre-shape and bench rest for 20–30 minutes to allow the remaining gluten in the dough to relax. If the dough is not relaxed enough it will resist your final shaping and the seeds may even tear out of the surface.
Begin by placing the dough on an oiled or lightly floured surface, shape it into a basic ball but leave it for a for a short bench rest.
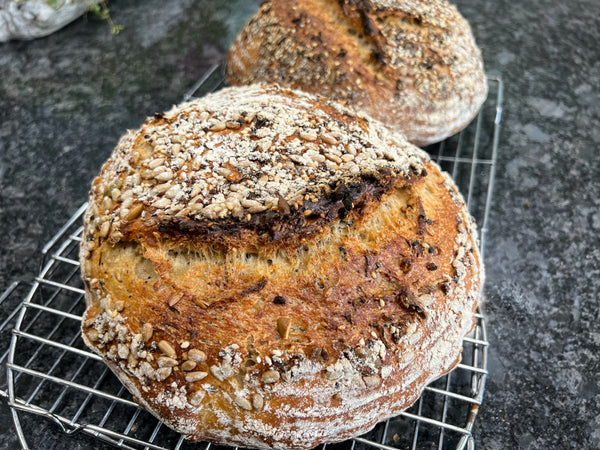
To shape it in a boule, start at the top and fold the dough over toward the center. Then roll the dough like a jelly roll, turn and repeat several times until the dough tensions together as shown to the right.
Finally, using a bench knife or your hands, turn the dough in a flat circle until it shapes into a ball, tucking and turning the dough as you go.
For a visual understanding of how to do this, see Lagerstrom video beginning at 7:32 for his shaping tand final "seeding" techniques. He places the shaped loaves seam side up into floured proofing baskets, covers with a tea towel, and proofs them at room temperature for an additional hour or two. Then he places them in fridge overnight for 8-12 hours for his long ferment.
-
FINAL RISE
Martha suggests after the long ferment, shaping them, and just giving them another 30–40 minutes before baking in a covered bowl or proofing basket. Either way works well.
The dough is ready to bake with is is puffy, but it will not have doubled this time.
During this final rise, preheat your oven to 465°F/240°C with your Dutch-oven placed inside to also preheat.
- SCORE THE LOAF
Prepare a sheet of parchment so that you can easily lower the dough into the hot Dutch Oven
Invert the proofing basket onto the parchment (I hold my hand under the bowl with the parchment on my palm). Support the bread on parchment as you invert it, then remove the proofing basket.
Dust the top of the dough with flour. With your hands gently rub the surface spreading the flour evenly.
Then using a bread lame or a razor blade, score the dough with any way you’d like.
-
BAKE THE BREAD
Using the parchment, transfer the dough to the heated Dutch oven.
Bake the bread on the middle rack of the oven for 20–30 minutes, covered (or uncovered in an oven that has a pan of boiling water on a lower rack).
If baking without water, remove the lid and continue to bake for 10–20 minutes to crisp the crust, otherwise total time with heat is 30–40 minutes.
Then turn off the heat, but leave the loaf in the oven for 30 more minutes as it cools along with the oven and the crust hardens.
Transfer to a wire rack for final cooling before slicing.
While many folks like to eat bread hot, sourdough needs to cool completely before slicing to avoid a gummy center. Personally I like it the second day, as the flavor develops throughout the loaf.
In the comment section below tell us about how your first loaf turned out.
___________________________________________

Author: Darryl Alder lives with his wife in Riverside Lodge, which is their home, along the Provo River in Utah. He is a retired career Scouter and outdoorsman who spent many hours over a campfire using a Dutch oven and loves sharing recipes for the kitchen and the campfire alike. You'll find many of his recipes on this blog and can follow him on Facebook, Instagram, YouTube, and Twitter.
1 comment
I attended a Day in Ancient Israel, where i saw part of your demonstration. It was great and very informative. I wasnt able to ask questions and am curious about the Ezekial bread. Could you contact me please?